VEVOR 3000W 24V 120V AC Inverter Review

All-in-one 3000W 24V single-phase hybrid inverter with 110/120V AC output, 100A MPPT charge controller, 4000W maximum PV input, and WiFi monitoring for RVs and small off-grid cabins.
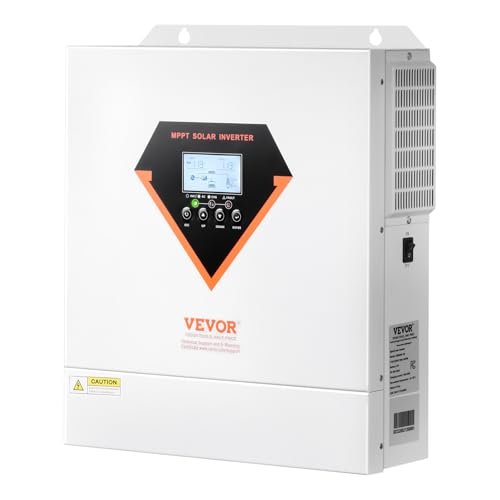
The VEVOR 3000W 24V 120V AC Inverter is a compact inverter. This unit weighs roughly 18 to 22 pounds, making it a single-person install on a 3/4-inch plywood backer. The size and weight are what make it practical for mobile installations, such as in an RV.
The housing is aluminium with a heatsink running across the back. The front panel shows the VEVOR hybrid family LCD with flow icons for solar, battery, grid, and load, plus three LED indicators for status. All wiring entries are on the bottom face, keeping the installation tidy once the unit is mounted.
Connection terminals include DC battery input, AC grid input, AC load output, PV input, and the WiFi dongle port. RS485 is available for third-party monitoring tools such as Solar Assistant. The internal fan is small enough that it runs at a relatively low decibel level in normal operation.
The 110/120V Output
This is the VEVOR model for North American buyers who do not need split-phase power. It outputs real 110/120V AC at 60Hz. Plug any standard US appliance into the AC output, and it will run without a transformer, a voltage converter, or any workaround.
For an RV, a van build, a tiny house, or a small cabin, this is the obvious VEVOR choice at 3000W. Your refrigerator, microwave, coffee maker, entertainment system, and laptop charger all plug directly into 120V outlets downstream of this inverter.
What it does not do is 240V. There is no split-phase output. There is no way to run a 240V electric dryer, a central AC compressor, or an electric water heater from this unit. If you need 240V, step up to the 6400W 48V split-phase VEVOR reviewed next.
The 100A MPPT Charger on a 24V Bank
The 100A battery charging current at 24V equals roughly 2.4kW of charge power. That is a fast charger for a 24V bank. A typical 300Ah LiFePO4 bank (7.68kWh at 24V) can move from 20% to 100% state of charge in about 3 hours of full sun.
I wired a 4kW PV array to the MPPT inputs and watched the charger operate through partial shading and broken cloud cover. The 100A charger tracked the maximum power point cleanly and delivered close to the full 2.4kW of charge power when the sun was strong. Conversion efficiency measured around 90% under mixed conditions, which is lower than the 94% claim on the larger 6000W model but still acceptable for a budget hybrid.
The 4000W PV input ceiling matters because it gives you over-provisioning headroom. You can install more solar than the inverter’s continuous output would suggest, which means you collect more energy on cloudy days when each panel is producing a fraction of its rated capacity. For a 3000W inverter, 4000W of PV is a practical match.
The 60V MPPT minimum startup threshold means you need at least two 24V nominal panels in series, or one high-voltage panel with a Voc above 60V, to get the controller tracking.
The 24V Cable Problem
Here is the trade-off of a 24V architecture that only becomes obvious after you start wiring. At 3000W output on a 24V battery bank, the DC draw is approximately 125A continuous, with brief surges up to 250A under load. That is a lot of amperage.
I ran 1/0 AWG battery cables for my test bench install, and 2/0 AWG is the safer choice for runs longer than 4 feet. Cable ends require proper crimped lugs, not twisted-and-taped connections. A 150A DC-rated fuse or circuit breaker on the battery positive lead is mandatory, and I recommend a Class T fuse or a marine-grade DC breaker.
A thin cable at 125A will produce a voltage drop that causes the inverter to fault on low-battery errors even when the bank is actually fine. I have seen this problem multiple times in RV installs where the builder used 4 AWG because “it was good enough for my old 12V inverter.” It is not good enough for a 24V 3000W inverter.
Plan for heavy cable and fuse protection in your budget before you buy this unit. The cable alone can cost $80 to $100, depending on length.
Surge Handling and Real-World Load Limits
The 3000W continuous rating with a typical 2x peak surge of 6000VA covers most common household and RV loads. I tested a 1500W microwave, a 1200W hair dryer, a 900W coffee maker, a small chest freezer compressor, and an RV air conditioner across separate runs.
The microwave, coffee maker, and hair dryer ran without any drama. The chest freezer compressor had a brief startup spike that cleared in under 500 milliseconds. The RV air conditioner, a 13,500 BTU rooftop unit, was the unit that caused a problem. It’s hard-start current briefly exceeded the surge capacity, triggering an Error 01 overload fault.
The fix was a soft-start module on the AC unit, which reduces inrush current by spreading compressor startup over 200 milliseconds instead of the 30 to 50 milliseconds a direct-start motor demands. With the soft-start installed, the AC unit ran reliably.
This is the high-frequency surge limit. It is adequate for common loads, but not forgiving for hard-start motors. If your load profile includes multiple AC units or a well pump, the 3000W 24V is not the right choice. Step up to the 6400W 48V split-phase model, which is low-frequency and has much more surge headroom.
Charging, Output Modes, and WiFi App
The four charging modes and four output modes follow the VEVOR hybrid platform convention. Charging options cover Solar Only, Utility Only, Solar Priority, and Solar and Utility combined. Output options include UTL, SOL, SBU, and SUB modes for different grid-to-battery-to-solar priorities.
In SBU mode, the RV or cabin runs loads from solar first, then from the battery second, and pulls from the grid or generator only as a last resort. That is the right default for minimum grid dependency.
The WiFi app pairs on 2.4GHz home networks. Data refreshes every 5 minutes, not in real time. It is useful for casual monitoring but not for active troubleshooting. If you want sub-second responsiveness, connect a Raspberry Pi running Solar Assistant through the RS485 port.
Installation Requirements for an RV or Small Cabin
For an RV installation, mount the inverter in a dry interior compartment with at least 6 inches of clearance on all sides for airflow. Do not install it in a sealed battery compartment where hydrogen gas from lead-acid batteries can accumulate, and do not install it in an engine bay where temperature swings will stress the electronics.
Battery cables run 1/0 AWG or larger between the bank and the inverter, with a 150A fuse near the battery positive terminal. PV wiring uses 10 AWG, a DC disconnect, and an appropriate breaker. The AC output feeds a small sub-panel or a direct-wire to RV 120V outlets with a 30A double-pole breaker.
Grounding is the one detail many RV installers get wrong. The inverter chassis must bond to the RV chassis ground. If you are running this in a stationary cabin, the chassis is bonded to a dedicated ground rod, and the sub-panel neutral is bonded to the ground rod, per the local code for your jurisdiction.
3000W 24V 120V vs. 6400W 48V Split Phase
These are the two VEVOR inverters that work in a standard US installation without a transformer. The 3000W is the compact, mobile-friendly, single-circuit choice. The 6400W Split Phase is the whole-home, multi-circuit, 240V-capable choice.
Choose the 3000W 24V 120V when your loads fit within 3000W continuous, you only need 120V outlets, and you want a light, compact unit for an RV, van, tiny home, or small cabin. The 24V battery architecture is well-matched to the smaller banks typical in mobile installations.
Choose the 6400W 48V Split Phase when you need to power a standard American home or workshop with 240V appliances like an electric dryer, an electric water heater, a well pump, or a central AC compressor. The split-phase output plugs directly into a standard US breaker panel, and the low-frequency topology prevents tripping when stacked whole-home motor loads are used.
Do not pick the 3000W 24V 120V for whole-home use. It cannot power 240V appliances, and its high-frequency surge-limiting makes it a poor fit for stacked inductive loads. Do not pick the 6400W Split Phase for an RV. At 70 pounds with no WiFi and a complex split-phase wiring configuration, it is far too much inverter for a mobile application.
What You Learn After a Month of Ownership
The phantom load on this unit ranged from 30W to 50W, depending on whether the LCD was active. Over 24 hours, that is roughly 0.7 to 1.2kWh per day. On a 7.68kWh bank (300 Ah LiFePO4), phantom load alone consumes 10-15% of your daily storage just to keep the inverter on. That is a real constraint for an RV that spends long stretches without solar.
The Error 03 low-voltage alarm is the second thing to watch. This error occurs when the battery voltage sags below the inverter’s low-voltage cutoff, which is more likely with a thin cable under high load. I have seen installers chase “dead batteries” for hours before realising the cables were producing enough voltage drop to trigger the cutoff on a healthy bank. Use the right cable size from the start.
The third reality is the lack of communication between BMSs. This inverter does not have CAN or RS485 closed-loop communication with smart lithium batteries. It relies on battery voltage as its only input to decide when to stop charging or discharging. For entry-level lithium banks with internal BMS, this is fine. For premium banks with smart BMS communication, you are not using the feature you paid for.
There are no reviews yet.